Using CTFd's REST API
CTFd updates and retrieves relevant data through its REST API. However, this functionality is not limited to the application itself, but it is also available to any tool that can communicate via HTTP that has the proper request configuration.
Creating and sending API requests using cURL
To demonstrate the basic usage, we'll create a new user in a CTFd instance by sending a request to its API using cURL. cURL allows us to easily customize our request according to the API's requirements.
To follow through the tutorial you can use the demo instance. Take note that it resets every 30 minutes.
Generating an Access Token
Every API request requires an Access Token. To generate one, log in as an administrator and follow the instructions here. You can use this token until your specified expiration date.
Choosing an API endpoint
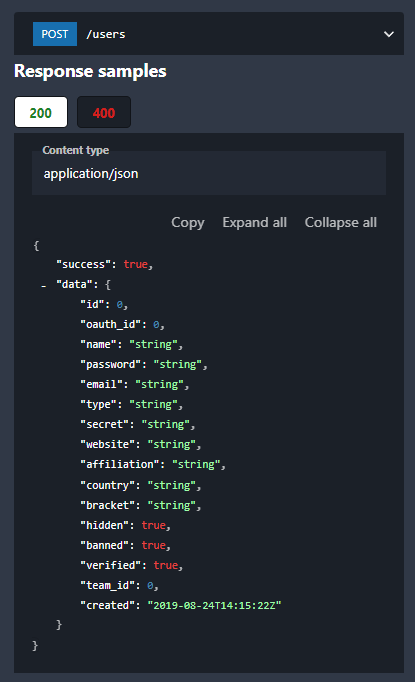
Choose the endpoint that creates a new user. We'll refer to the API endpoint documentation for the list of available endpoints.
In the API documentation (shown in the picture below), select post_user_list, and take note of its request method and endpoint, which are POST and /api/v1/users, respectively.

Providing the appropriate payload
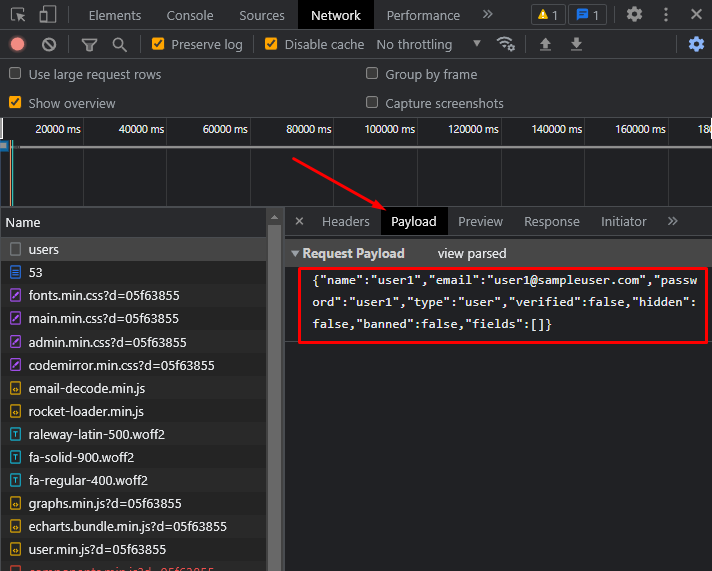
Since we are sending a POST request, we need a JSON payload that contains our new user's details.
The CTFd API endpoint documentation is still a work in progress. Therefore, to get the appropriate payload structure for the request, you would need to create a new user in CTFd as you normally would. Then, inspect the request made by the CTFd web application using your browser's Developer Tools. To achieve this, do the following:
In your browser, open the Developer Tools and navigate to the Network tab.
Make sure to Preserve Log for Google Chrome or Persist Logs for Mozilla Firefox. This prevents the network request logs from refreshing once the browser sends the
POSTrequest when we create a user.Google Chrome

Mozilla Firefox

Keep your developer tools open. Then, go to CTFd and add a new user.
Once you clicked Submit check the developer tools for the user request. And verify if the request is the one that we want, where the method is
POST, and the endpoint is/api/v1/users.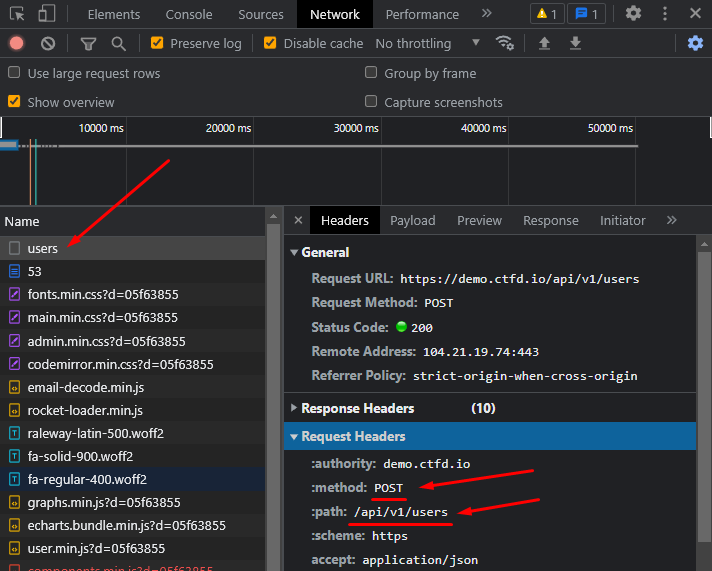
Once verified, take note of the payload's structure.
For other requests, you can use the same process for determining the payload for their specific endpoints.
Sending the request
Now that we have everything we need to make a request, open your terminal and input command below. Replace the necessary fields with your actual data, such as your instance's <domain>, <access token>, and desired payload placed after the -d flag.
curl -X POST https://<domain>/api/v1/users \
--header "Authorization: Token <access token>" \
--header "Content-Type: application/json"
-d "{\"name\":\"user1\",\"email\":\"[email protected]\",\"password\":\"user1\",\"type\":\"user\",\"verified\":false,\"hidden\":false,\"banned\":false,\"fields\":[]}"
-Xflag specifies the request method, in this case it'sPOST--headerflags allow you to specify the type of header to include in the request. The CTFd API requires theAuthorizatonandContent-Typeheaders.-dflag allows you to specify the data you want to send, which has to be enclosed in quotes. In the example above, the quotes in the JSON payload are escaped using the escape\character.
Just add an empty object "{}" when sending requests without a specific payload.
Once you have provided the required input, press Enter. You should expect a response from the API endpoint. If it is successful, you would get the following:
Sending API requests using a Python script
Manually sending API requests can be very tedious. However, you can certainly use other tools that can automate this process.
While any HTTP library/tool can be used to interact with the API, it is easiest to use Python with the requests library.
In this tutorial we'll use two Python scripts, provided by CTFd, that will allow us to add and delete a user.
Requirements
Adding a user
Download the Adding a user Python script. Once downloaded, the filename may have a hash after it, so rename it to
add-user.pyfor easy reference.Create a folder and place the
add-user.pyfile inside it.Open a terminal inside the folder we just created and install the requests library with:
pip install requestsLet's inspect the script and make some changes. Open the
add-user.pyin a text editor. You'll see the following:- line 7 & 8 - the script accepts 2 arguments, a
URLand atoken - line 16 - Header:
Authorizationwith thetokenvariable - line 20 - the method,
POST - line 21 - the endpoint,
{url}/api/v1/users(you can refer here for choosing an endpoint) - line 22 - JSON payload
- line 23 - the representational header,
Content-Type
You may notice that the payload is hardcoded. You may change it to your liking.
If the payload is not properly structured, the server responds with an "internal server error". To add the right one, refer to this section.
- line 7 & 8 - the script accepts 2 arguments, a
#! pythonimport requestsimport sysdef main(): try: url = sys.argv[1] token = sys.argv[2] except IndexError: print("Usage: python3 add_user.py <url> <admin_token>") sys.exit(1) # Create API Session url = url.strip("/") s = requests.Session() s.headers.update({"Authorization": f"Token {token}"}) # NOTE: If you wish for the user's credentials to be emailed to them, pass the # notify=true parameter in the URL. For example: /api/v1/users?notify=true r = s.post( f"{url}/api/v1/users", json={"name":"user5","email":"[email protected]","password":"user1","type":"user","verified":False,"hidden":False,"banned":False,"fields":[]}, headers={"Content-Type": "application/json"}, ) print(r.json())if __name__ == "__main__": main()Save your changes, and run it using your CTFd instance's URL and generated Access Token. For example:
./add-user.py https://demo.ctfd.io e8v6d87f6ef9hhe3a0k976g3d7h6d5d9j7g56h7g9h9h8j4gs0b9g45s9If the request is successful, it should return:
Deleting a user
Download the Deleting a user Python script. Once downloaded, the filename may have a hash after it, so rename it to
delete-user.pyfor easy reference.Create a folder and place the
delete-user.pyfile inside it.Open a terminal inside the folder we just created and install the requests library with:
pip install requestsLet's inspect the script. Open the
delete-user.pyin a text editor. You'll see the following:- line 7 & 8 - the script accepts 3 arguments, a
URL, atoken, and the user's ID. - line 17 - the header
Authorization, with thetokenadded as an argument - line 20 - the method
DELETE, and the endpoint{url}/api/v1/users/{user_id}(you can refer here for choosing an endpoint)
- line 7 & 8 - the script accepts 3 arguments, a
#! pythonimport requestsimport sysdef main(): try: url = sys.argv[1] token = sys.argv[2] user_id = sys.argv[3] except IndexError: print("Usage: python3 delete_user_example.py <url> <admin_token> <user_id>") sys.exit(1) # Create API Session url = url.strip("/") s = requests.Session() s.headers.update({"Authorization": f"Token {token}"}) # NOTE: It is important below to set the json argument so that requests sets the Content-Type correctly. r = s.delete(f"{url}/api/v1/users/{user_id}", json="") print(r.json())if __name__ == "__main__": main()Save your changes, and run it using your CTFd instance's URL and generated Access Token, and the user's ID. For example:
./delete-user.py https://demo.ctfd.io e8v6d87f6ef9hhe3a0k976g3d7h6d5d9j7g56h7g9h9h8j4gs0b9g45s9 6If the request is successful, it should return:
